|
Recumbent Bicycles
Saturday, 26 May 2012
How I Found a Great Way to Get Into Bents: Used Recumbent Bicycles!
Used recumbent bicycles help lower the cost of getting into recumbent cycling. Bent's are low in production and manufactures have to increase cost to make a profit. Some 'bents cost upwards of $5,000. Some people just don't have that kind of cash to put in to a bicycle. However, there are people out there looking to upgrade. So, they will sell their bikes, take that money, and put forth toward a new bike. Buying used recumbent bicycles is great way to get a good bike for a great price. Also, bicycles are just like computers: infinitely upgradeable. If you by a used bike you can spend as much money on upgrading as you like. Since recumbents are more expensive, it's more cost effective to upgrade a machine than to buy a new one. Unlike mountain bikes which are inexpensive because of mass production, it would be more cost effective to buy a new mountain bike than to upgrade it. Bent Riders Online Bent Riders Online's forum has a classifieds section for people wanting to buy/sell used recumbent bikes and equipment. You can always find good deals there. I found a great deal on a set of 20/26 Alex DH-16 wheels for $90! To have a set of wheels custom built silimar to this would cost you about $200. The Hostel Shoppe The Hostel Shoppe is the net's largest recumbent bicycle order house. They also have a classifieds section. There deals aren't quite as good as Bentrider's classifieds section.
Now for the Whys
Steel Frames: Steel is Real! That's the cliché nowadays with regard to using steel to build frames. Steel has been around a long time. In fact, steel weapons were being made in India as early as the 4th century B.C. By 250 - 200 B.C. iron and steel had become common metals in India. Today, steel bicycle frames are made from 4130 chromoly. It's much lighter and stronger than regular steel. Race cars and many airplanes use 4130 tubing for their frames. Steel has a springy quality: it bends and flexes, but always returns to it's original position, kind of like a bridge. Ever notice during rush hour how you can feel a bridge sway? That's what a steel frame bicycle is like, except it doesn't flex as much. Benefits of Steel - Strong.
You won't have to worry about the frame cracking when touring on rough roads. - Easy to weld/repair.
You can MIG weld, TIG weld, or braze chromoly. Some don't suggest MIG welding chromoly because it's so thin, but Greenspeed, the world's #1 recumbent trike maker uses MIG welding. MIG is available in every corner of the world. So, if you're into world touring, if your frame cracks you can easily get it welded. - Relatively Cheap.
4130 chromoly steel has been around for the better part of a century. It's produced in large quantities. Therefore, it's easy for companies to keep cost down. In other words, you can build a strong, relatively light bicycle for which can handle any road conditions for much less cost than titanium.
Aluminum Aluminum frames are known for having a stiff ride. You don't have that flexy feeling that you get when riding steel bikes. Instead, aluminum frames have a fast, responsive feel. Therefore, comfort is sacrificed because the frame doesn't give. This is great for racing. However, tourist are not as concerned about weight as our racing counterparts because we're not racing we doing it for the adventure. Also, with a good recumbent seat, the stiffness of aluminum will be kept to a minumuim. Benefits of Aluminum - Rust Proof.
Aluminum does corrode, but nowhere near as fast as a steel. - Lighter than Chromoly.
Aluminum has become the new standard in mountain bikes. If you go to a local bike shop that only sells traditional diamond frames, aluminum is king. It's lighter and stiffer than steel. Because of the mass production of aluminum tubes it's becoming cheaper than steel.
Titanium Titanium is like steel as far as ride and strength goes. It's also much lighter given the same tubing size. The main benefit is you can build a stronger lighter bike with the same size tubes. You'll be a faster racer! Benefits of Titanium - Super Light
- Super Corrosion Resistant
- Super Strong
The main downside to using titanium is cost. It's some of the most expensive stuff you can buy. But if you are obsessed with weight reduction, titanium is the way to go. It also uses more expensive welding equipment to weld. Titanium is a great choice for racing, but for touring the cost is too great for the intended job.
Thursday, 24 May 2012
Proven, Easy to Follow Recumbent Bicycle Plans!
Okay, you've decided to build a 'bent from scratch. A set of recumbent bicycle plans is the best way to go because you'll always have a reference. So, what plans are available? Well, here you go. I've put in links to proven, time tested plans with reviews and more to come! Short Wheelbase Plans: Xntrick Wooden SWB Plans  Okay, this is cool! Wooden recumbent bicycle plans. No welding! Just use the wood working the skills many of us already have. It's durable. Think about it: Did Christopher Columbus have a titanium hull when he sailed the ocean blue? Also, many airplanes use wooden frames, including aerobatic planes. So, why not use wood for a bicycle frame? Admit it: this looks cool! Wooden bicycles make you look twice. Steel nor carbon fiber bikes look this good. What's more it's made from 2 x 4s. Just cut to length. Simple, easy, step by step instructions lead you on. I will buy a set of plans myself. Navigation may be a little tricky. Just click on the recumbents icon/picture and you will see Jame's bike pop up on the next page, as well as email and address to buy these wooden recumbent bicycle plans. Cruzbike This is a neat little design. It makes use of a pre-existing y-frame mountain bike. I think it's a great value. Many people already have a y-frame mountain bike in their garage. Or, you can get one from a pawn shop: CHEAP! This is one of the most cost effective ways to get into recumbent bicycles. Bentech Recumbent Plans  Here is a great find. One of their design philosophies is COST EFFECTIVENESS. Face it: 'bents are expensive because they are either made by hand or produced in limited quantities. Bentech offers a great alternative. A good bike at low cost. And because they sell recumbent bicycle plans you can of course customize the bike for your needs. They even have Yahoo Forum for those going through the process of building. So, you won't be alone. Others who have gone through the process can help you along the way. They also sell tube kit and frame kit options. So, if you can't find anyone to bend, cut, and miter(fishmouth) 4130 steel you can buy the pre-bent tubes or a full frame kit and build from there. They also have long wheelbase plans!
Wednesday, 23 May 2012
Build a Recumbent Bicycle WITHOUT WELDING!
 This is unique in that you can build a recumbent bicycle WITHOUT WELDING/brazing. I stumbled across this little gem on the bentrider's forum. This is unique in that you can build a recumbent bicycle WITHOUT WELDING/brazing. I stumbled across this little gem on the bentrider's forum. 
You do this buy taking a pre-existing y-frame mountain bike and adding a Cruzbike's front triangulated fork. This converts your mountain bike into a front wheel drive, recumbent bicycle high racer! I've spoken with John from Cruzbike via email on several occasions. Even though he is on the other side of the world he still manages to answer emails within a few hours. Here are John's thoughts: Advantages in Touring Are: No chain to interfere with panniers, [which leaves a lot less for you to worry about.] You can add considerable weight below the seat and between the wheels to give very good weight distribution - the fully loaded Cruzbike with rider should have almost exactly 50-50 weight distribution between the wheels. [This is great for technical descents where you're going down hill at 45+ mph (72+ kph). You don't have to worry about the rear end fish tailing around a sharp curve or the front end pushing, rather the the front wheel doesn't turn. It just starts sliding. You can end up wrapped a round a telephone pole! In other words, you'll be safe with a Cruzbike recumbent bicycle] For stretches on trains, the swivel nose can be swung to the right all the way around, tucking the greasy chain safely under the seat where no one will get dirty from it and shortening the wheel base by another 3 to 4 inches. [You wont take up much space at all on trains, buses, and airplanes. So, transportation will be much easier.] All the running gear is interchangeable with standard mountain bikes, so replacing worn parts is dead easy, pretty well anywhere. High pressure 26" tyres combined with dual suspension give a quick, smooth and very comfortable ride. [No more pain, it's the end of RECUMBUTT!] An upgrade will come through later in the year, which can be retrofitted, to allow the running gear from a racing bike: chainwheel, cranks, 700c wheels etc. Again, maintaining this running gear will be possible in just about any LBS you happen across. [You'll be fast as all get out!]  Front Wheel Drive Bracket is built from ball bearing MTB swing arm pivots and should never need replacement. [That's great for long cross country tours: no need to worry about the front fork falling apart!] You can ride no hands (but do this only on smooth road surfaces) which is handy for adjusting your helmet, getting your camera out, putting on sunscreen, peeling a banana... The ride height puts you eye to eye with car drivers. [Most bents are lower to the ground and can be hard for other drivers to see you. Once again, you'll be safer on this recumbent bicycle.] Pulling up a hill is made easier by the ability to lever against the handlebars. [Many traditional cyclists climb hills by standing up on the pedals and pulling up on the handle bars. With a recumbent bicycle this is impossible. So, Cruzbike has fixed the problem! You can now get the same type leverage you could with a traditional diamond frame bike] Summary In short, this is the most worry free way to get a recumbent bicycle. A few days ago I was at a police auction on the university campus. They hand about 100 to 150 bicycles to auction off. Some were pieces of junk. Others were crown jewels waiting to be resurrected. There were many y-framed bikes that would have been perfect for Cruzbike concept. I even saw some $300+ bikes go for just $30!! Cruzbike's kit costs $350 US Dollars. Imagine $30 for a bike, $350 for the kit and you've got a bent. You can't find a recumbent bicyle for less than $400. Even used bents can cost upward of a $1,000. This is great value. Check'em out:
Tuesday, 22 May 2012
Trike Plans:
Greenspeed They are the Godfather of trikes. I ordered these recumbent bicycle plans 6 months ago. They come with 15 CAD drawings, complete with measurements and instructions for building every aspect of the trike, a wheel building chart to calculate spoke length, and a parts list. You won't have to guess at anything. If you do have questions you can email Paul Simms who runs the factory. They always answer emails within a few hours even though they're on the other side of the world! They make you feel honored. It's amazing that the world's #1 recumbent trike manufacturer will just sell their blue prints to anyone who'll buy them. It's a great value. It's an OPEN SOURCE bent! Thunderbolt Trike Detail, detail, detail. Ricky Horwitz has done a great job with the Thunderbolt Trike concept. These plans are available for FREE through the International Human Powered Vehicle Association. It's more than a set of plans. It's an all out treatise on building trikes. Somewhere on the site Mr. Horwitz says he wants to known as the man who wrote THE BOOK on trikes. Horwitz has been building trikes for about 12 years, which is almost as long as Greenspeed has been around. Topics include: - Steering System Theory
- Brake Systems
- Welding Options
- Parts and tools needed
- Chain Management
- Seat Building
Overall, this is a great way to get started in building a trike without spending any money on recumbent bicycle plans. Long Wheelbase Plans: The Gold Rush design is the bent that broke the 50mph speed barrier. The Tour Easy, the consumer version, is a strong design. Bents built from these plans have been known to hole 260+lbs riders plus a trailer and gear. It's a great way to get into recumbent cycling at little cost. If you have a old mountain bike or even and old 10 speed laying around you can reforge it and give it new life. No sense in throwing away your old bike(s). Backyard Bents's plans are the similar to the recycled recumbent design above. These plans have been in existence for at least 20 years. The footnotes in the text site books are from the mid 70s. No one knows where the plans came from or who made them, but they are widely available on the net and it's a proven design. Plus, it's FREE!!! I think of them as (OBS) Open Source Recumbent Bicycle Plans! La bent by Ladue Recumbent Bicycle Plans I bought a set of these plans a couple years ago when I first got into recumbent bikes. I bought both the LWB and delta trike versions. The plans are well laid out and give a list of items to buy. Ladue has included many CAD drawings to help understand the process. I think this is an awesome bike build. LaDue calls for square mild steel tubing to keep cost down, but 4130 chromoly steel is a much better choice. - Chromoly is 3x as strong as mild steel given the same thickness.
- 4130 chromoly steel is relatively cheap. It's been around for decades.
- Plus, it's airplane tubing. This means you'll have a bike which is 3x stronger and much, much lighter simply by changing the metal. Plus, cost would not increase very much. $60 - $70 is about all it would cost for tubing in chromoly for this bike.
Stay tuned, folks. I'll be adding more recumbent bicycle plans on a regular basis.
Monday, 21 May 2012
Three Easy Ways to Find the World's Best Bicycle Saddlebags for You Needs!
How to choose: Bicycle saddlebags are actually called bicycle panniers. It is derived from the French word panier, which means basket or container. It's pronounced 'pan-yer, like PAN/ear. In other words, just pronounce it the way it looks. It surprises me that we don't use the term bicycle saddlebags because they function more like saddlebags on horses than little bread baskets at the grocery store. Oh, well, the point is moot. Anyway, let's look at the best way to choose a set of panniers for your needs. Step One First you need ask yourself, “What will I use them for?” Commuting, touring, world expeditions, hauling books for class, groceries, laundry are all options. Step Two Once you decide on a purpose, determine the storage capacity you need. This can be challenging, especially if you're like me: I pack everything I'll never need. If you buy panniers that are too large you'll carry around a bunch of dead space. Buy too small and you won't have enough storage capacity to haul your stuff. Thus, making your panniers useless. I tend to go a little larger than the bare minimum I need. For most commuting one 23 liter/1400 cubic inch pannier is plenty. That will give you lots of space for groceries or books if you're in school. Two 23. liter/1400 cu. in. bicycle saddlebags would give you lots of space. Here is a chart which give general estimates on storage capacity need for each type activity. Keep in mind this is only a guideline. So don't be obsessive compulsive about it. Also, for commuting, you'd be surprised at how much stuff you can pack into just one bicycle saddlebag. A fully loaded single pannier won't change the way the bicycle handles. It's strange, but that's how it works. 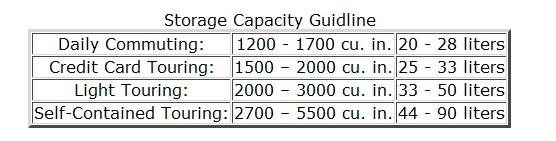
Step Three Chooose from the two available options: buying a commercial set of panniers, or make your own. Commercial Systems: Go with Ortlieb or Arkel. They are the best commercial bicycle saddlebags money can buy. Ortlieb makes more than just bicycle saddlebags they make motorcycle saddlebags, racks, bicycle mirrors and other accessories. I've never used them, but many cyclists swear by them. It would be an insult not to include them. Arkel is a Canadian company. They have the world greatest customer support. I think they rate up there with Apple Computer Company because they treat each customer like a gem. I've ordered 2 sets of bicycle saddlebags from Arkel over the years. Their product is just as good as their service. Each set of panniers is packaged well and they give you lots of brochures and info. The best thing about Arkel pannier is their Hook System. It is the STRONGEST in the industry. The best way to describe it is like unto an I-beam on a construction site. They just don't break. I've done bunny hops and jumped curbs. Once I the pannier half on and it still didn't fall off. It's nearly impossible for these panniers to become unhooked. Homemade Pannier Overview: Make your own panniers! It isn't hard. I've built a set for myself over a year and a half ago using Arkel's Hook System. I called them the Buckets of Doom. Homebuilt panniers have two categories: bags or buckets. The easiest way to make panniers is to find an already made bag or bucket and convert them to saddlebag duty. The hardest way would be to sew up your own bags together from Canvas or Cordura. Many hikers, backpackers, and mountaineers make their own outdoor gear including backpacks, tents, stoves, even clothing and rain gear! So, if you have experience in sewing, GO FOR IT. If not, stick with the conversion idea. Bags: The best thing to do find an Army/Navy Surplus store and buy an A.L.I.C.E. (All-purpose Lightweight Individual Carrying Equipment ) Pack. The military uses these to carry all their gear. They can be used with or without the frame or straps. They come of 3 basic sizes: small, medium, and large. 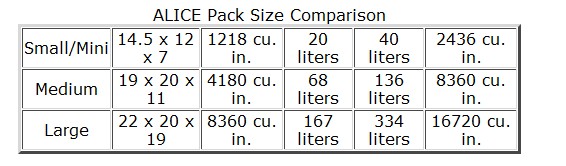
They range in price from $24.99 (Mini Alice Pack) to $89.99 (Large ALICE Packs) each. So, this is a very cost effective solution for bicycle saddlebags. Also, with 2,436 cu. in. (40 liters), a pair of small ALICE packs would do for most touring. In all, It would cost approx. $70 to build a 2,436 cu. in./40 liter set of panniers. Arkel's T-42 costs $149 and have a 2500 cu. in/42 liter capacity. Ortlieb's Bike Packer Plus 2,441 cu. in./40 liter costs $200. Talk about savings! Buckets: Some people use old square Cat litter buckets to make their bicycle panniers. Some have even used Rubbermaid Containers These are fine, but the best buckets to use are square buckets made of High Density Polyethylene manufactured by Ropak Central. I used these to build the Buckets of Doom. Polyethylene is a very dense plastic which can take the rigors of touring. It's really stuff stuff. You can get them from U.S. Plastic U.S. Plastic sells them in 4 and 5 gallon sizes. That's 1075 cu. in. and 1,344 cu. in. (17.6 and 22 liters) respectively. With two pannier that totals 2150 cu. in. and 2688 cu. in. (35.2 and 44 liters) respectively. Plenty of storage space! Hook System: I used Arkel's Hook System when building my hardshell bicycle saddlebags because the hook system was already made. All I had to do was bolt them onto the buckets! Simple. Easy. You can also order the Ortlieb hook system. At any rate, buying a prefab. hook system is the easiest way to go. I hope this article helps you decide which bicycle saddlebags are right for you!
Three Easy Ways to Find the World's Best Bicycle Saddlebags for You Needs!
So, you're building a 'bent. What bicycle tubing should you use? Bicycle tubing is getting lighter and lighter. This is primarily due to the sport of bicycle racing. In road racing, of course, you need the lightest/strongest stuff you can find. However, for long cross country touring in various road conditions, the lightest/strongest stuff isn't the best choice. Also, remember the #1 Rule of Outdoor Gear: cheap, light, and strong; pick 2 out of 3. You can have light and strong, but it won't be cheap. You can have light and cheap, but it won't be strong, and so on. Steps to Choosing Your Bicycle Tubing Step #1 - Define Purpose The first thing you've got to do when buying bicycle tubing is to figure out it's purpose. Are you interested in touring, racing, commuting, or fun riding? Are you interested in building a recumbent bike, BMX, mountain, or road bike? Certain metals are better for certain applications than others. For instance, using titanium just fun riding in the park is a big waste of money. On the other hand, using steel for touring is great because the frame bends and flexes. This adds great comfort for long rides. More on this later. Step #2 - Select Materials for the Job Other than the material from which the tubes are made, the main thing is to consider bicycle tubing types. For instance, aircraft tubing (4130 chromoly) works well for homebuilding projects. It's relatively cheap, widely available and easy to weld. However, the tubing has to be thicker through out the length of the tube which makes it heavier. It's called straight gauge bicycle tubing. A single butted tubing is thicker on one end of the tube. The strongest/thickest end would be used in areas which take more stress. Double butted tubing is thicker at the ends than in the middle. This is a great way to reduce weight and strengthen the tube. Butted tubes remind me of old lugged frame bicycles. Instead of welding, these tubes were brazed into lugs which made for a natural double butted frame. There is also, triple and quadruple butted tubing in which the ends and middle sections are of unequal thicknesses, thus creating even stronger frames. Step #3 - Purchase Bicycle Tubing You can either buy tubing from companies that deal specifically with bicycle tubing or buy from a steel shop for straight gauge tubing. I chose to buy from Aircraft Spruce. They sell products to aircraft homebuilders. They stock many sizes and thicknesses of 4130 chromoly and aluminum. Nova Cycles This is a good source for frame building in general. They have steel, aluminum, and titanium bicycle tubing. Aircraft Spruce. I've bought from these folks many times. They're service is fast. They'll cut to length. Every order gets to me within 2 to 3 days. This is a great source for straight gauge 4130 chromoly. They also sell aluminum tubes. Columbus Bicycle Tubing A reputable bicycle tubing company. They sell steel, aluminum, and carbon fiber. They even have a new type of steel alloy called Thermacron, which is closer to the weight of aluminum. The great thing about steel is that it continues to get lighter and stronger as the years pass.
Build a Recumbent Bicycle Options
Trike Builds: 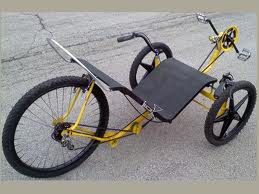
These are by far the most difficult type to build. But if you want to build a recumbent bicycle, trikes are King of the Road. They are three wheeled, human powered go carts. With tadpole trikes, the hardest part is building the steering/braking system and the crossmember. With delta trikes, the hardest part is building the drive system. Tadpole trikes have 2 wheels in the front and one wheel in the back and are read wheel driven. Although I have seen front wheel drive models, rear wheel drive is the standard. Delta Trikes have one wheel in front and two wheels in the back. Most delta trikes I've seen are one wheel drive. A two wheel drive delta trike would necessitate some kind of differential which would make the trike as heavy as lead in a black hole. The same goes for front wheel driven tadpole trikes. Trikes are heavy buy nature and using a differential would add too much weight. Thus, rendering the trike less practical.
Frame Set Builds: 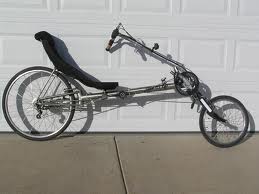
Let's face it: the diamond frame (DF) world enjoys building bikes from frames sets. That is you can buy the bare frame, headset, fork, stem as a kit and just transfer components from your other bicycles or just pick and choose the components you like best. For instance, I want to build a recumbent trike. I want more than 27 gear combinations. A great way to do that is to add a quad chainring as opposed to a triple chainring. If I bought a factory built trike, I would have to throw away the stock crankset. Well, that's a waste. In recumbent world, these options are limited. That's because not many 'bent manufacturers sell frame sets. But as 'bents become more and more popular, more frame set options will become available. Tube Kit Builds: Some companies sell the tubes for their 'bents. The tubes are precut and mitered (fish mouthed) and come with a set of plans. All you have to is weld them up. This will make it easy for you to build a recumbent bicycle. This is also a great time saver, as tube mitering by hand can take FOREVER. Your arms will be ripped like Mr. Arnold by the time you get done with your first 'bent. Tube Kits Come With: - Bare unpainted frame parts
- Forks
- Rear triangle
- Seat tubes
- Seat cushion or fabric (sometimes)
- Handle bars(sometimes)
- Stem(s)
- All tubes pre-cut and mitered
- Basically, everything to build a recumbent bicycle except the transmission!
Plans Built: Plans built bents are great because you always have a standard to go by. You can make modifications based on the plans. You can stray as little or as much as you need to in order to accommodate your needs. For instance, if the plans call for 1.75 inch diameter tubing and you are over the weight limit for the plans, you can just increase the tubing to 2 inch diameter. Building from plans offers complete customization from a rock solid proven design. Sometimes it's best to buy the plans first to assess how much time and energy the project will take. Then you will be in a better position to determine if you really want to build a recumbent bicycle. Built From Scratch: Okay, for you hardcore types this will excite you. No plans, no drawings, just build a recumbent bicycle with raw imagination and a BUTT LOAD of luck. No really, there are some who find this option quite satisfactory. If you're an engineer, then, luck has got nothing to do with it. But for us mere mortals...Well, just let the pros handle it. I've heard pilot's who decide to build their own airplane instead of buying one. They enjoy the building process. Sure they like flying, but the building process cuts into thier flying time. That's why many 'bent builders will build a recumbent bicycle in the winter so that spring, summer, and fall can be used for riding. Conclusion: Building CAN cut cost, depending on the options you choose. Another great thing about building is that you can build as you can afford to. Some high end trikes can reach $5,000 or more. Not only can you build a recumbent bicycle for about half the price, you can buy the frame set first, then, weld. Save more money, then, paint. Save and build the wheels. You see the point? You may not have $3,000 for your dream bent, but you can spend $100 here and $300 there. Overtime this will add up. Pros: - Custom build a machine to your own needs (You could build 135 speed machine if you want!)
- Can Cut cost.
- Pride of having built it yourself
Cons: - More time consuming.
- Cost of tools could overall undercut saving. (There are other options).
This is just an overview of what's avaiable. I'll be posting links to actual plans to build a recumbent bicycle in a few days. So, please come back by.
How to Build a Recumbent Bicycle for Touring.
If you're looking for a 'bent for your next tour. Why not build a recumbent bicycle? There are several options for building that will allow you to create a great machine for your next tour, even if you're not a welder! We'll look at the pros and cons of build vs buying, as well as, available options for building, and levels of difficulty between various options. The first thing you have to do is determine what type person you are. Do like to build things? Do you tweak things? Do have a deep seeded need to figure out how things work? If so, you can easily build a recumbent bicycle. If you are just trying to save money, you may do best to buy outright or go for the frame set build up which we will discuss later. Various options are listed below. So, take a look and enjoy! Short Wheel Base Builds: 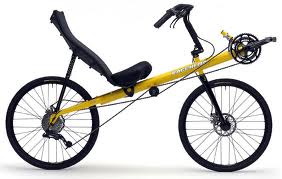
Short Wheel Base machines are the easiest to build because it's easier to keep the wheels in alignment. The front and rear wheels have to be in the same plane. With a short wheel base machine this is easier to accomplish. I consulted a welder while planning to build my Greenspeed trike. He said, “Son, when these plans say an inch and three quarters, they MEAN an inch an three quarters.” Then, I hit me... Steaming down Mount Cheaha at 45+ MPH with 50+lbs of gear is NOT the time to think, “I wonder if I was off by a quarter inch on the crossmember?” Remember Allen Shepard's prayer? “O God, please don let us screw up” or something to that effect? Well, if you have any doubts let the pros handle the frame and wheel building. If you want to build a recumbent bicycle, SWB machines are easy. This would be a great first 'bent-- especially, if you hacked the rear triangle off an old mountain bike and used that as your rear triangle. Some would say that SWB 'bents are not for touring, that they're better suited for racing. Rev. Johannes "Hans" Erich Myors has pedaled more than 140,000 since 1993. Last I checked he was riding a SWB machine by Lightning Cycle Dynamics. Now Lighting recumbents are known for being the fastest racing 'bents in the world, and this guy is using it as a hardcore touring machine! Long Wheel Based(LWB) Builds: 
Okay, whether you choose to build a LWB or a SWB 'bent, it is hard to keep both front and rear wheels in the same plane. But with LWB machine (65 inches or more), the chance of misaligning the wheels is MUCH greater. If youare willing to undertake the precision ecessary to achieve good wheel alignment, then LWB's offer great rewards. If the wheels are out of alignment you're not going to have fun. You'll be fighting the machine with each pedal stroke. And you will be much slower. Worse, you'll get a serious wobble which can be life threating at speed. However, LWB 'bents make for great touring. It's like floating on air. Downhill on a LWB machine is like riding a steel roller coaster. Taking the extra time needed to ensure proper alignment will be worth it. Want to build a recumbent bicycle? You can't go wrong with a long wheel base machine!
The World's Best Recumbent Touring Bicycles
 I was out riding yesterday on an old country road. To my left were lush green fields filled with young corn. To my right were fields of overgrown hay, set to replenish the soil for next year's crop. I was out riding yesterday on an old country road. To my left were lush green fields filled with young corn. To my right were fields of overgrown hay, set to replenish the soil for next year's crop.
It's FLAT here in the Black Warrior River's flood plain. I'm not much for hills! Up ahead I saw the an old plantation. With tall white pillars and black window shutters, this place stands as one of the last symbols of the “Old South.” I thought, “If these fields could talk, I wonder what stories they would tell"? When riding through places like this I wonder, "How many slaves were beaten, castrated, raped, or killed in these fields”? I rode a little further and noticed a man on a tractor cutting grass. His little son sat on his lap while they both went cutting and bouncing along. That kid was happy and all was good with the world. Just then, I saw fellow cyclist riding toward me. He had some kind of mountain bike, a white helmet, and rode at a slow and easy pace. “Good morning,” he said.
“Hey, hi ya doing?”
“Well, just fine.”
That's what I love about touring: you can SEE America. Ohhh! The Pain... I don't know about you, but wouldn't you want to experience adventures like these with as much comfort as possible? Traditional, diamond frame bicycles cause a lot of pain for me. Crotch corrosion, spaghetti shoulders, and wrist wring out take ALL the fun out of touring. But there is a solution: recumbent touring bicycles. Recumbents were built for two reasons: speed and comfort. For us tourists, COMFORT is more important. As a musician I understand the need for ergonomics. Riding a traditional diamond frame bicycle just doesn't cut it for long, cross country tours. With the right recumbent touring bicycle all these PAINS and DISCOMFORTS are NO MORE. Bents ain't cheap. So, I've included several sections for building your own machine to help lower cost. Take a look around, and have fun.
Newer | Latest | Older
|
| « |
October 2013 |
» |
 |
| S |
M |
T |
W |
T |
F |
S |
|
|
1 |
2 |
3 |
4 |
5 |
| 6 |
7 |
8 |
9 |
10 |
11 |
12 |
| 13 |
14 |
15 |
16 |
17 |
18 |
19 |
| 20 |
21 |
22 |
23 |
24 |
25 |
26 |
| 27 |
28 |
29 |
30 |
31 |
|